I get a lot of questions regarding photography and how to take better candid shots, so I decided to start answering those questions within my e-newsletter and here on{the blog}.
This question comes from a client of mine who got a Canon DSLR around the time her son was born:
“I want to take pictures similar to your photo of the month that has a focused image and a blurred background. Is this a lens need or a sofware editing need? I have tried to change the settings on my camera and don’t see a difference. Do I need a different lens other than the one that came with my camera (18-55mm). Do I need photoshop? Any advice is appreciated. Thanks so much.”
OK, first off, Ms B is referring to this first image from Mr L’s session that was last month’s photo of the month in the April’s Yvonne Niemann Photography e-newsletter. Notice how Mr L’s face is in great focus and the background and an area in front of him on the bed are blurred into a nice creamy smoothness? That’s bokeh as a result of the shallow depth of field, which I adore and do a lot of with my portraits to really make my subjects stand out and pop! This is something I achieve with my lens choices and where I place my subjects – not using editing software. I don’t like to spend a lot of time processing my images in my digital darkroom, so I try to get things as perfect in camera as possible. Sure lenses can make a difference, but before you go out and buy a new lens try out these tips with the lens you have and see if you get better results.
1) Use the smallest f/stop number that your lens allows. With your 18-55mm lens, that would be f/3.5 at 18mm (wide angle) and f/5.6 {zoomed all the way in to 55mm}. To choose your f/stop, you’ll want to be in M {manual} mode or AV {aperture priority) mode. (AV is a Canon thing – for those shooting with Nikon, you’ll set it to A}. The higher the f/stop number, the more will be in focus. This is perfect for when you want everything in your frame in sharp focus {think landscape}. In this example though, you want your subject to be in focus and your background out of focus, so you will need to choose a low f/stop number as I’ve outlined above.
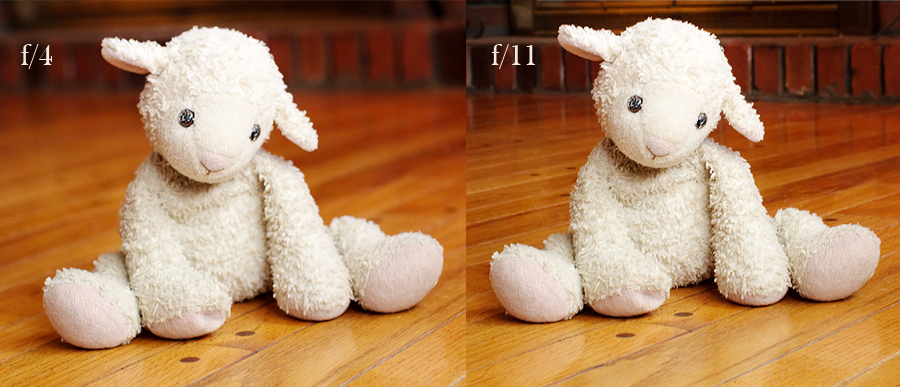
Here’s an example using my daughter’s beloved lambie. Below, on the left, I have my lens set to f/4 and on the right, I have the same lens set to f/11. See a difference?
2) Keep your subject far away from the background and zoom your camera all the way in {with your lens, that’s 55mm}.
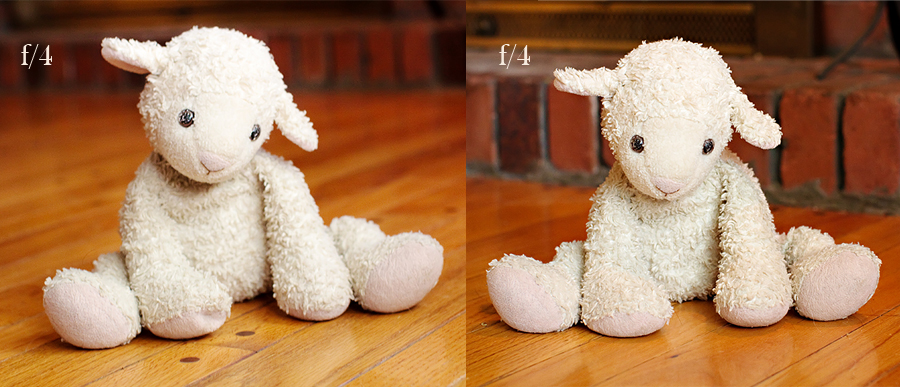
Notice that the picture on the left, the subject is further away from the wall than the one on the right. Do you see the difference that makes? Both images are at f/4 and are zoomed in to 50mm, but just the simple placement of the subject makes all the difference with how much is out of focus in the background.
OK, now practice this at home and see what you think. Take several shots at different f/stop numbers and at different distances and see how it affects your final image. If you’re STILL wanting more bokeh {remember, that’s the out of focus area of an image}, then perhaps you want to look into getting another lens. I highly suggest the 50mm f/1.8 lens {Canon and Nikon both make this lens} and it’s around $100. I do have to warn you though…it’s very hard to get things that you want in focus at those low f/stop numbers. It takes a lot of practice and therefore you may find yourself using that lens at a higher f/stop number until you get a grasp of things anyways. I strongly urge you to make the most of the equipment you have and only upgrade when you’re feeling limited and have learned how to use your current lineup to it’s fullest.
For those of you without a DSLR, you can still apply these tips with your point and shoot camera. Most will allow you to set your f/stop number these days and if not, well then just zoom in, keep your subject away from your background and have fun!
Hope this was helpful and please don’t hesitate to let me know if you have more questions. I know this can seem overwhelming and complicated, so I just hope it makes sense. If not, let me know and I’ll try to clarify.
If you have questions about photography and how to make your treasured candid shots even better, subscribe to the Yvonne Niemann Photography e-newsletter and e-mail me your question to info@yvonneniemannphotography.com Each month, I’ll answer questions in the newsletter from subscribers. I won’t always post the answers here on the blog, so if you want to be “in the know” you’ll have to subscribe to the newsletter.
Good luck!


